Creamy Basundi Recipe – A Classic Indian Milk Dessert

Basundi

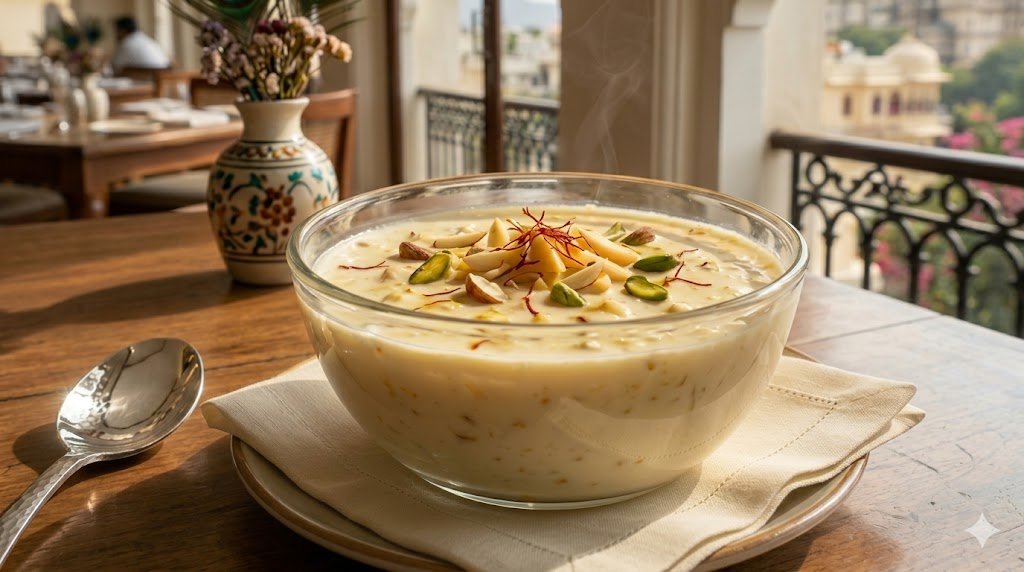
Basundi is one of those timeless Indian desserts that feels like comfort in a glass. Originating in western India—especially Maharashtra and Gujarat—this rich, cardamom-flavored milk pudding is slow-cooked until luxuriously thick and then chilled and garnished with nuts and saffron. Whether you’re serving it on Diwali, at a wedding, or just as a weekend treat, basundi is always a crowd-pleaser.

In this recipe, we’ll show you how to make perfect basundi at home, step by step, without any fancy equipment—just a heavy pan, full‑fat milk, sugar, and warm spices.


Ingredients (Serves 4–6)

(Click on ingredients to order them beforehand.)


Step‑by‑Step Method

1. Reduce the milk

  • Pour 1 liter of full-fat milk into a heavy-bottomed pan.
  • Bring it to a boil over medium heat, stirring occasionally to prevent burning.
  • Once it starts boiling, reduce the heat to low and simmer uncovered, stirring every few minutes.
  • Cook for 30–45 minutes, or until the milk reduces by about half and turns thick and creamy. Be patient—the slow reduction gives basundi its rich texture.

2. Add sugar and flavor.

  • When the milk is nicely reduced, add crushed cardamomnutmeg, and sugar.
  • Stir well and cook for 5–7 minutes on low heat, letting the sugar dissolve and the flavours blend.
  • If you want a slightly thicker, richer texture, mix 1 teaspoon of plain flour or cornflour with 2 tablespoons of cold milk, then stir it into the hot basundi. Cook for another 2–3 minutes, stirring constantly, until it thickens further.

3. Add saffron and chill

  • If using saffron, soak a few strands in 1–2 tablespoons of warm milk for 5–10 minutes, then stir into the basundi.
  • Turn off the heat and let the basundi cool for 10–15 minutes.
  • Once lukewarm, pour it into a bowl or serving glasses and refrigerate for at least 3–4 hours, or until cold and set.

4. Garnish and serve

  • Just before serving, sprinkle chopped almonds or pistachios on top.
  • Add a few extra saffron strands for a royal touch.
  • Serve chilled, either on its own or with pooris or hot puran poli for a traditional Maharashtrian–Gujarati meal.

Tips to Get Perfect Basundi

  • Always use full-fat milk for the richest, creamiest texture.
  • Stir frequently toward the end to prevent the milk from sticking to the bottom of the pan.
  • For a faster version, you can use market khoya/khoya-based mixes or condensed milk, but homemade reduced milk tastes far better.
  • If basundi becomes too thick while cooling, you can stir in a little cold milk to loosen it slightly.

High-Protein Chocolate Mousse: Guilt-Free Indulgence for Busy Foodies!

Chocolate Mousse

Indulge in this creamy, dreamy, high-protein chocolate mousse that’s perfect for RecipesBuzz! readers craving a healthy dessert without sacrificing flavor. Ready in just 15 minutes with no cooking required, it packs over 25g of protein per serving using simple ingredients like Greek yogurt and protein powder—ideal for post-workout treats or late-night cravings.

Why You’ll Love It

This mousse transforms basic pantry staples into a rich, chocolatey delight that’s low-carb, keto-friendly, and naturally sweetened. At RecipesBuzz!, we focus on quick recipes for home cooks, and this one delivers a silky texture without gelatin or heavy cream.

It’s versatile too—top it with berries for antioxidants or nuts for crunch, keeping it aligned with our Indian-inspired twists like adding a hint of cardamom.

Ingredients (Serves 2)

Click on the ingredients to order them.

Nutritional perks per serving: ~25g protein, 150 calories, 5g carbs—buzzworthy for fitness goals!

Step-by-Step Recipe

  1. In a blender or with a hand mixer, combine Greek yogurt, protein powder, cocoa, sweetener, vanilla, and salt. Blend until smooth.
  2. Slowly add almond milk while blending to reach a fluffy mousse texture—about 30 seconds.
  3. Taste and adjust sweetness; fold in peanut butter if using.
  4. Spoon into bowls or glasses, then chill for 10-30 minutes for the best set.
  5. Garnish with cocoa dust, fresh fruits, or crushed nuts before serving.

Pro Tip: For an Indian fusion buzz, stir in elaichi (cardamom) powder—like a chocolate kheer upgrade!

Recipe Tips & Variations

Chill overnight for cafe-style firmness, or whip egg whites for extra volume (cook them first for safety). Vegan swap: Use coconut yogurt and pea protein. Make-ahead: Stores in the fridge up to 3 days.

Common Fix: Too thick? More milk. Not chocolatey? Extra cocoa.

This high-protein chocolate mousse is your new go-to for satisfying sweet tooths smartly—perfect for RecipeBuzz! meal prep or dessert boards. Tried our version? Share your pics and tweaks in the comments below. Craving more? Check our paneer tikka or biryani posts next!

Frothy Sweet Lassi Recipe | RecipesBuzz! – Creamy Yogurt Drink in 5 Mins!

Sweet Lassi

Welcome to RecipesBuzz!, your go-to spot for easy Indian recipes! Dive into this classic sweet lassi, blending chilled curd with sugar and cardamom for 2 generous glasses of pure bliss. It’s our latest addition to cooling drinks that pair perfectly with chicken seekh kebab or street-style snacks.

Ingredients for RecipesBuzz! Lassi (Serves 2)

If you don’t have these ingredients handy already, click on them to order them beforehand.

Easy Steps at RecipesBuzz!

  1. In a blender, combine curd, water/milk, sugar, cardamom, rose water, and ice.
  2. Blend on high speed for 1-2 minutes until thick, frothy, and smooth.
  3. Taste-test: Add more sugar if needed or yogurt for a creamier texture.
  4. Pour into chilled tall glasses and top with nuts or saffron.

RecipesBuzz! Pro Tips

  • Extra Frothy: Use a tall vessel and an electric beater if no blender.
  • Thicker Version: Skip water; add a scoop of vanilla ice cream.
  • Vegan Hack: Coconut or almond yogurt works wonders.
  • Flavor Boost: Infuse with mango pulp for our mango lassi variant.

~180 calories per glass. Serve with pakoras or after biryani for the ultimate combo!

Readers, this lassi is a game-changer! Whip it up and share your pics with #RecipesBuzzLassi. Craving more? Try our chicken seekh kebab next. Comment your twists below!

Sizzling Chicken Seekh Kebab Recipe at RecipeBuzz! – Juicy Skewers in 30 Minutes!

Chicken Seekh Kabab

At RecipeBuzz!, we’re all about bringing street-style Indian flavors to your kitchen with easy, crowd-pleasing recipes like these smoky Chicken Seekh Kebabs. Minced chicken packed with ginger-garlic, fresh herbs, and warm spices grills up tender and charred—perfect for iftar, barbecues, or weeknight appetizers serving 4.

Key Ingredients for RecipeBuzz! Perfection (Serves 4)

Click on the ingredients to order them from Amazon.

Step-by-Step at RecipeBuzz!

  1. Mix chicken with onion, herbs, ginger-garlic, spices, besan, lemon, and salt. Knead lightly 4-5 mins (no overmixing to keep tender).
  2. Chill 30-60 mins for flavor lock-in.
  3. Skewer into 4-5-inch cylinders on soaked skewers; press smooth.
  4. Grill/tawa on medium-high for 3-4 mins/side, basting with ghee. Or oven at 200°C/400°F for 12-15 mins.
  5. Smoke with ghee-charcoal for 1-2 mins if desired.

Pro Tips from RecipeBuzz!

  • Squeeze the onion dry to prevent crumbling.
  • Test one kebab first; add egg if too loose.
  • Medium heat avoids dryness.

Serve with mint chutney and naan—~250 cal/serving. RecipeBuzz! readers love pairing it with biryani!

These kebabs are RecipeBuzz! Gold—tag us in your pics! Craving more? Check out our Paneer Tikka or Chicken Biryani posts.

Crispy Chicken Harabhara – Green Herb Kebabs That Steal the Show

Chicken Harabhara

If you love aromatic, herb‑packed kebabs with a deep green, crispy crust, Chicken Harabhara is a must-try dish for your kitchen. Originating from North Indian kebab traditions, this dish features minced chicken patties coated in a thick green chutney paste (harabhara mix), then shallow‑fried until golden and crunchy.

At RecipeBuzz!, we love turning classic kebabs into easy‑to‑make home recipes, and this Chicken Harabhara is perfect for weekend dinners, party platters, or as a bold side to tandoori chicken, biryani, or a simple paratha‑rilawali meal.


What makes Chicken Harabhara special?

  • Bold green crust: The patties are smothered in a herb‑rich chutney of coriander, mint, and green chilies, giving a fresh, aromatic crunch.
  • Tender, juicy interior: Inside, the chicken patty stays soft and moist, balancing the crisp outer layer beautifully.
  • Party‑ready snack: Easy to scale up, these harabharas work great as a starter platter, a side with biryani, or a quick snack with tea.

Ingredients (Makes 14–16 patties)

For the chicken harabhara mixture

Click on the ingredients to order them beforehand.

For the green harabhara coating

For frying and serving


Step‑by‑step method

1. Prepare the chicken patties

  • In a large bowl, combine minced chicken with:
    • Finely chopped onion
    • Ginger‑garlic paste
    • Chopped green chilies
    • Green peas (if using)
  • Add:
    • Garam masala
    • Coriander powder
    • Cumin powder
    • Red chili powder
    • Salt
    • Chaat masala (if using)
    • Cornflour or breadcrumbs
  • Mix well with your hands until the mixture holds together without being too wet.
  • Divide into 14–16 small balls and flatten each into a round patty (about ½ inch thick).
  • Cover and refrigerate for 20–30 minutes so the patties firm up and hold shape while frying.

2. Make the harabhara (green) coating

  • In a blender or food processor, combine:
    • Coriander leaves
    • Mint leaves
    • Green chilies
    • Onion
    • Cumin seeds
    • Coriander seeds (if using)
  • Blend into a thick paste, adding a little curd or yogurt and 1–2 tbsp oil for smoothness.
  • Add a pinch of salt and blend again briefly.
  • Adjust consistency: it should be thick enough to coat the patties but not runny.
  • Transfer this green paste into a shallow bowl.

3. Coat and fry the harabharas

  • Take one chilled chicken patty, dip it in the green harabhara paste, and coat it evenly on both sides. Repeat for all patties.
  • Heat oil in a heavy pan for shallow frying (or deep frying if you prefer).
  • Gently place the coated patties into the hot oil.
  • Fry on medium‑low flame, turning once, until both sides are golden brown and crisp (about 3–4 minutes per side).
  • Remove with a slotted spoon and drain on kitchen paper to remove excess oil.

Serving ideas

  • Serve hot with lemon wedgesmint chutney, or tamarind‑date chutney for dipping.
  • Pair Chicken Harabhara with tandoori chickenroyal biryani, or falooda for a full Indian-style meal series you can feature on RecipeBuzz!.
  • For an appetizer platter, serve with mirchi ka salanraitaonion rings, and kachumber salad.
  • Great for weekend dinners, Rakhi or Eid occasions, or as a starter feature in an “Indian Kebab Special” post on your blog.

Tips for the best results

  • Keep the chicken mixture lightly moist but not wet; if it feels loose, add a little more cornflour or breadcrumbs.
  • Don’t skip the chilling step—it helps the patties stay intact while frying.
  • For a healthier version, pan‑sear or shallow‑fry with minimal oil instead of deep‑frying.
  • Adjust green chilies to your heat level: fewer for milder flavor, more for a fiery kick.

With this Chicken Harabhara RecipeRecipeBuzz! brings you a restaurant‑style, herb‑packed kebab that’s easy to reproduce at home and perfect for readers who love bold North Indian flavors.

Authentic Hyderabadi Biryani Recipe – How to Make Restaurant‑Style Dum Biryani at Home

Hyderabadi Dum Biryani

Authentic Hyderabadi Biryani Recipe – How to Make Restaurant‑Style Dum Biryani at Home

Few dishes capture the grandeur of Indian cuisine like Hyderabadi Biryani. Fragrant basmati rice, tender chicken, and the subtle warmth of saffron, ghee, and whole spices come together in a slow‑steam “dum” cooking method that turns a simple rice dish into a royal feast.

This recipe focuses on a classic chicken-based Hyderabadi biryani that stays close to the traditional style you’d find in Hyderabad’s best dhabas and family kitchens.


What makes Hyderabadi biryani special?

Hyderabadi biryani is more than just seasoned rice and meat. It’s defined by its layered, dum‑style preparation, where the flavors meld slowly in trapped steam.

  • Dum cooking: The meat and rice are layered and sealed so the biryani cooks slowly in its own juices, locking in aroma and tenderness.
  • Fragrant layers: Saffron‑infused milk, fried onions, and marinated chicken are stacked in layers, so every spoonful has a mix of textures and aromas.
  • Balanced spice: Whole spices, ginger‑garlic, green chilies, and biryani masala create depth rather than aggressive heat.

Ingredients (Serves 4–6)

For the biryani rice

(Click on the ingredients below to order them on Amazon.)

For the biryani masala (chicken)

For the saffron layer


Step‑by‑step method

1. Marinate the chicken

  • In a large bowl, mix chicken with:
    • 1 tbsp ginger‑garlic paste
    • 1–2 tsp chili powder
    • ½ tsp turmeric
    • 1 tbsp biryani masala
    • Salt
    • 1 tbsp oil
  • Add 1 cup curd/yogurt and rub well into the chicken pieces.
  • Cover and refrigerate for at least 2 hours (4–6 hours or overnight for best flavor).

2. Cook the biryani masala

  • Heat 1–2 tbsp ghee or oil in a heavy‑bottomed pan.
  • Add 1–2 slit green chilies and sauté for 30 seconds.
  • Add 1 roughly chopped onion (if you want extra body) and cook till golden.
  • Add any leftover ginger‑garlic paste and cook for 2 minutes.
  • Add the marinated chicken with its marinade.
  • Cook on medium‑high heat, stirring occasionally, until the chicken turns opaque and the masala thickens (about 10–12 minutes).
  • Stir in:
    • 1 tsp coriander powder
    • ½ tsp chili powder (if needed)
    • Salt to taste
  • Reduce the heat and cook for 5–7 minutes more until the chicken is almost done but not dry.
  • Turn off the heat and mix in chopped mint and coriander leaves, plus 2–3 tbsp fried onions. Keep aside.

3. Cook the basmati rice

  • Drain the soaked basmati rice and rinse once.
  • In a large pot, bring 3–4 cups of water to a boil with whole spices and 1 tsp salt.
  • Add the rice and cook until 70–80% done (grains are soft but still slightly firm in the center).
  • Drain immediately and spread the rice on a tray to cool slightly; this prevents mush.

4. Prepare the saffron milk

  • Soak a pinch of saffron strands in 2–3 tbsp warm milk with a pinch of sugar. Keep aside. The infusion will give the biryani a rich golden hue and subtle perfume.

5. Layer the biryani (dum-style).

Use a heavy pot with a tight‑fitting lid (like a pressure pot without the weight or a deep handi).

  1. Bottom layer:
    • Lightly grease the pot with ghee.
    • Spread a thin layer of fried onions (birista).
  2. First meat layer:
    • Spread the cooked chicken masala evenly.
  3. First rice layer:
    • Spread half the cooked rice over the masala.
  4. Middle layer:
    • Sprinkle mint and coriander leaves.
    • Add a few more fried onions.
  5. Second meat layer (optional):
    • Add the remaining chicken masala if the pieces are large.
  6. Top rice layer:
    • Finish with the remaining rice.
  7. Saffron and ghee:
    • Drizzle the saffron milk over the top.
    • Add 1–2 tbsp ghee for extra aroma.
    • Garnish with reserved fried onions and a few mint leaves.

6. Cook on “dum” (steam cooking)

  • Cover the pot with a tight lid.
  • Place the pot on a tawa (or a flat plate) and cook on a low flame for 20–25 minutes.
  • For a more authentic seal, place kitchen foil around the lid or use a dough ring (atta) around the rim to trap steam.
  • After cooking, turn off the heat and let the biryani rest for 5–10 minutes so the flavors meld before serving.

Serving ideas

  • Serve hot with raita (cucumber, boondi, or onion), mirchi ka salan, or dahi kebab.
  • Pair it with tandoori chicken, grilled kebabs, or a simple salad for a complete meal.
  • For dessert, finish the meal with faloodadouble‑ka‑meetha, or khubani ka meetha.
  • Great for weekend dinners, family gatherings, or festive meals like Eid.

Tips for the most authentic taste

  • Always use bone‑in chicken or mutton for a richer flavor.
  • Don’t overcook the rice before layering; it should finish cooking in the dum.
  • Seal the lid properly to trap steam and aroma—this is the heart of Hyderabadi biryani.
  • Use good-quality saffron and ghee; they transform the perfume and richness of the dish.

Easy Royal Rose Falooda Recipe – Mumbai‑Style Dessert in a Glass

Mumbai‑Style Royal Rose Falooda Recipe

Nothing screams Indian summer dessert quite like a tall, pink, layered Royal Rose Falooda. Inspired by the famous Mumbai Irani‑café‑style drink, this version is rich, creamy, and absolutely Instagram‑worthy—perfect as a finale after your tandoori chicken or biryani feasts. Best of all, you can make it in under 20 minutes using simple ingredients from your kitchen.


Why this falooda recipe works

  • Restaurant‑style looks, home‑style simplicity: The layers of rose‑infused milk, vermicelli, sabja seeds, and ice cream mimic the classic Mumbai falooda you see in Irani cafés and sweet shops.
  • Customisable: Adjust sweetness, add fruits like strawberries or mango, or swap the jelly for agar‑agar if you like.
  • Perfect for parties and festivals: Serve this as an Eid specialRamzan dessert, or summer party treat and watch it disappear fast.

Ingredients (Serves 2)

Click on the ingredients to order them from Amazon!


Step‑by‑Step Instructions

1. Prepare the sabja seeds

  • Soak 1 tbsp sabja seeds in ½ cup water for 10–15 minutes until they swell and form a gel‑like texture.
  • Drain excess water and set aside; you’ll use this as a textural layer in your falooda.

2. Cook the vermicelli

  • Boil 2 cups of water in a small pan. Add ¼ cup vermicelli and cook for 3–4 minutes until soft but not mushy.
  • Drain, rinse under cold water, and keep aside. This gives the classic “falooda sev” feel at the bottom of the glass.

3. Make the rose milk

  • In a saucepan, boil 2 cups of milk with 1–2 tbsp of sugar until slightly thickened. Let it cool, then stir in 2–3 tbsp rose syrup to get a beautiful pink colour.
  • Chill the rose milk in the fridge for 10–15 minutes so it stays cold when layered.

4. Assemble the falooda (key step for the look)

Use tall, clear glasses to make the layers pop.

  1. Rose syrup base: Add 1 tsp rose syrup in the bottom of each glass.
  2. Jelly layer: Add a spoonful of rose or fruit jelly for a soft, jiggly layer.
  3. Vermicelli: Spoon a layer of cooked vermicelli on top.
  4. Sabja seeds: Add a spoonful of soaked sabja seeds; they add a lovely, refreshing texture.
  5. Rose milk: Pour the chilled rose milk up to about ¾ of the glass.
  6. Ice cream: Top with 1–2 scoops of vanilla ice cream or kulfi.
  7. Garnish: Sprinkle chopped pistachios or almonds and a few dried rose petals. Drizzle a little extra rose syrup on top for shine.

Serve immediately while the ice cream is still soft and melting into the layers.


Tips for the best results

  • Use chilled ingredients: Keep milk, syrup, and ice cream cold for a super‑refreshing drink.
  • Don’t over‑cook vermicelli: Keep it soft but intact so it doesn’t turn mushy when layered.
  • Add fruits (optional): For a fruit‑falooda twist, add sliced strawberries, mango, or lychee between the layers.
  • Scale up for parties: Multiply all quantities by 2–3 and serve in stylish dessert glasses with spoons and straws.

How to Make Chicken Tandoori at Home (Easy Restaurant‑Style Recipe)

Chicken Tandoori

Welcome to RecipeBuzz!—your go-to kitchen companion for simple, flavorful dishes that look as good as they taste. Today, we’re bringing you a classic that never disappoints: chicken tandoori. With its juicy, smoky chicken and vibrant red‑orange marinade, it’s one of the most photogenic Indian dishes you can make at home—no tandoor oven needed.

In this recipe, I’ll show you how to marinate the chicken perfectly and cook it in an oven, air fryer, or even on a grill so it tastes like restaurant‑style tandoori, with plenty of tips to make it your own.


What Is Chicken Tandoori?

Chicken tandoori is chicken marinated in spiced yogurt and roasted in a tandoor (clay oven). The yogurt keeps the meat tender, while spices like cumin, coriander, garam masala, turmeric, and Kashmiri red chili give it that signature color and aroma.

For RecipeBuzz!, we simplify the process so you can get that same rich, smoky flavor using your regular kitchen tools and ingredients.


Ingredients (for 3–4 servings)

For the marinade:

For serving:

  • 1–2 tbsp oil or butter (for brushing)
  • Lemon wedges
  • Fresh coriander leaves
  • Sliced onions or a sprinkle of chaat masala (optional)

Step‑by‑Step: How to Make Chicken Tandoori (RecipeBuzz! Style)

1. Prepare the chicken

  • Wash the chicken pieces and pat them very dry with a clean cloth. This helps the marinade stick better and gives you a slightly charred, crisp finish.
  • If using bone‑in pieces, make 2–3 small slits on each to let the spices go deep inside. For boneless, cut into 1–1.5-inch cubes.

2. Make the marinade

  • In a large bowl, mix the yogurt, ginger‑garlic paste, lemon juice, and oil until smooth.
  • Add Kashmiri red chili, turmeric, cumin, coriander, garam masala, roasted cumin, and salt. If you like that bright restaurant‑style look, add a pinch of red color here.
  • Stir until the mixture is evenly colored and coats the back of a spoon.

3. Marinate the chicken

  • Add the chicken pieces to the marinade and massage them well so every piece is coated.
  • Cover and refrigerate for at least 2–3 hours, but 4–6 hours or overnight if you can. The longer it marinates, the juicier and more flavorful your Chicken Tandoori will be.

4. Preheat your cooking method

For an oven (RecipeBuzz! favorite):

  • Preheat your oven to 200–220°C (400–425°F).
  • Line a baking tray with foil and place a wire rack on top. Lightly brush the rack with oil so the chicken doesn’t stick.

For an air fryer:

  • Preheat the air fryer to 190–200°C (375–400°F).
  • Arrange the chicken in a single layer; you can cook in batches.

For a grill or tawa:

  • Oil the grill or tawa and heat on medium‑high.

5. Cook the chicken

Oven method:

  • Remove chicken from the marinade and shake off excess. Place pieces on the rack, skin side up if using bone‑in.
  • Brush lightly with oil or butter for shine.
  • Roast for 30–35 minutes, turning once halfway, until the chicken is fully cooked with nicely charred edges and an internal temperature of 75°C (165°F).

Air fryer method:

  • Place marinated chicken in the basket without crowding.
  • Air fry for 18–22 minutes, flipping once, until the chicken is cooked through and has a golden‑brown finish.

Grill / tawa method:

  • Grill or cook for 8–10 minutes per side, turning once, until the chicken is done and has clear grill marks.

6. Final touch

  • Just before serving, brush the chicken with a little melted butter or oil for that glossy finish.
  • Sprinkle a pinch of chaat masala or roasted cumin powder if you like, and garnish with lemon wedges and fresh coriander leaves.

Tips for Perfect Chicken Tandoori

  • Use bone‑in pieces whenever possible; they stay juicier and more flavorful.
  • Don’t skip the long marination; it’s the secret behind tender, restaurant‑style chicken.
  • Want a smoky taste? Add a tiny piece of lit charcoal (safely handled) in a foil packet in the oven, or use a pinch of smoked paprika in the marinade.
  • Adjust the spice level by reducing or increasing the Kashmiri chili and adding a bit of green chili paste if you like more heat.

How to Serve Chicken Tandoori on RecipeBuzz!

  • Serve hot with sliced onions, lemon wedges, and green mint chutney for that classic street food vibe.
  • Pair with naan, roti, or jeera rice for a full Indian meal.
  • For a lighter option, serve with a simple salad of cucumber, tomato, and onion.

Why This Recipe Works for RecipeBuzz!

Chicken Tandoori is colorful, aromatic, and incredibly share‑worthy—perfect for a blog like RecipeBuzz! that celebrates easy, impressive recipes you can actually make at home. With this recipe, your readers can recreate that restaurant‑style red‑orange chicken, snap a few photos, and feel like a pro cook in their own kitchen.

Try this how-to-make-chicken-tandoori recipe and tag RecipeBuzz! When you share your photos with friends or on social media. Happy cooking! 🍗✨

🥭 Mango Milkshake Magic: The Ultimate Summer Drink to Beat the Heat!

Mango Milkshake

When the sun is scorching and your taste buds are begging for something cool and creamy, this Mango Milkshake is your instant summer savior. Rich, silky, and bursting with fresh mango flavor, this fuss-free drink is ready in under 10 minutes—perfect for lazy afternoons, kids’ snack time, or as a sweet ending to your favorite Indian meal.

Whether you’re enjoying it solo on the balcony or serving it to friends at a weekend brunch, one sip of this golden‑orange shake will make you feel like you’re sipping on sunshine in a glass.

Mango Milkshake Recipe (Serves 2)

Ingredients

Step‑by‑Step Instructions

  1. Prep the mango
    Peel the mango and scoop out the pulp, removing the seed. Chop the flesh into small pieces so it blends smoothly and quickly.
  2. Blend the creamy base
    Add the mango pieces, cold milk, and sugar to a blender. If you like a richer, dessert‑style shake, toss in the vanilla ice cream. Blend on high for 30–45 seconds until silky smooth.
  3. Taste and adjust
    If the shake feels too thick, add a splash more milk and blend again. If your mango is not very sweet, add a little more sugar or honey and blend once more.
  4. Chill it like a pro
    Add the ice cubes and blend for another 15–20 seconds until the shake is frothy, cold, and lightly foamy on top.
  5. Serve with flair
    Pour into tall glasses or chilled mugs. Sprinkle a pinch of cardamom powder on top for that aromatic Indian‑style finish. Garnish with a thin mango slice or a straw and serve immediately!

Tips for the Perfect Mango Milkshake

  • Use only ripe mangoes—slightly soft, fragrant mangoes give the best natural sweetness and flavor.
  • Make it dairy-free—swap regular milk with almond milk, coconut milk, or soy milk for a vegan version.
  • Boost nutrition—add a spoon of Greek yogurt or protein powder for a filling, protein-rich version.
  • Keep it light—skip the ice cream and use a little more milk for a thinner, lighter shake.
  • No ice? No problem—freeze the mango pulp in advance and blend it “ice-free” for a super-smooth texture.

Pair It With Other RecipesBuzz Favorites
Turn this mango milkshake into a complete summer menu by pairing it with:

  • Mango Lassi—for a yogurt-based twist.
  • Nimbu Panna—for a tangy, cooling drink.
  • Paneer Tikka or Pav Bhaji—for a full Indian street food-style evening.

Loved this mango magic? Try our Mango Lassi and Nimbu Panna next for more summer sips!

Final Thought
This mango milkshake is summer in a glass—simple, refreshing, and impossible to resist. Make it once, and it’ll become your go‑to warm‑weather treat on RecipesBuzz!

Street-Style Paneer Tikka: Sizzling RecipesBuzz Favorite

Paneer Tikka

Nothing beats the smoky, spicy allure of street-style paneer tikka—those charred, masala-coated cubes straight from Indian roadside stalls that make your taste buds dance. At RecipesBuzz!, we’re all about bringing that chaatwala magic home with this easy recipe serving 4 in just 40 minutes. Perfect as an evening snack, party appetizer, or alongside drinks, it’s protein-packed vegetarian bliss with bold flavors.

Why RecipesBuzz! Loves Paneer Tikka

Originating from Punjab but a pan-India street food star, paneer tikka blends creamy paneer with a fiery yogurt marinade, grilled to perfection. It’s quick, customizable, and healthier than fried snacks—grilling locks in juices while adding that irresistible char.

Ingredients for RecipesBuzz! Perfection

Marinade Magic (makes it restaurant-level):

Skewers Add Crunch:

  • 1 medium onion, petals separated
  • 1 bell pepper (green or red), 1-inch cubes
  • 1 tomato, deseeded wedges

Buzz-Serving Sides:

RecipesBuzz! Step-by-Step Guide

Step 1: Whip Up the Marinade

In a large bowl, whisk yogurt, mustard oil, ginger-garlic paste, all dry spices, chaat masala, kasuri methi, lemon juice, and salt into a smooth, thick paste. Taste test: It should be spicy, tangy, and aromatic—like a street vendor’s secret.

Step 2: Marinate Like a Pro

Gently fold in paneer cubes, onion petals, bell peppers, and tomato wedges. Ensure even coating without breaking the paneer. Cover and refrigerate for 20-30 minutes (or up to 2 hours/overnight for deeper flavor penetration).

Step 3: Skewer and Grill to Glory

Preheat a tawa, grill pan, or heavy skillet on high heat. Thread 4-5 marinated pieces alternately with veggies onto soaked wooden/metal skewers. Brush lightly with oil. Grill 3-4 minutes per side, turning for even char marks and smoky edges. Paneer should firm up with golden-brown blisters.

RecipesBuzz! Pro Tip: For authentic tandoor smoke, use dhungar—place a lit charcoal piece in a foil cup with a tsp ghee inside the covered pan for 1-2 minutes. The aroma is game-changing!

Step 4: Final Buzz Finish

Sprinkle hot tikka with extra chaat masala while sizzling. Serve immediately with lemon wedges, onion rings, and chutneys for dipping and squeezing.

RecipesBuzz! Hacks, Variations & Nutrition

  • Texture Hack: Use firm paneer; lightly press or freeze 15 mins if soft.
  • Oven/Air Fryer Buzz: Broil at 450°F (230°C) for 8-10 mins, flip halfway; air fry 180°C for 10 mins.
  • Vegan Buzz: Sub extra-firm tofu, large mushrooms, or boiled chana.
  • Spice It Up: Add chopped green chilies or black salt for extra heat.
  • Make-Ahead: Marinate ahead; grill fresh for best crunch.
  • Storage: Fridge for up to 2 days in an airtight container; reheat on a hot tawa to revive crispness (microwaving sogs it).
  • Per Serving (2 skewers): ~250 calories, 20g protein, low-carb friendly.

This sizzling street food is addictive—juicy inside, charred outside, with spices that linger. At RecipesBuzz!, it’s our go-to for impressing guests or solo indulgence!

Craving more buzz? Pair with our pav bhaji or paneer tikka masala recipes. Grill up, snap a pic, and tag RecipesBuzz! We’d love to feature your version!